HOME / ORDER THE BOOK / OTHER BOOKS / THANKS
|
HOME / ORDER THE BOOK / OTHER BOOKS / THANKS |
|
ROGERS CADENHEAD
My WebsitesMy Books |
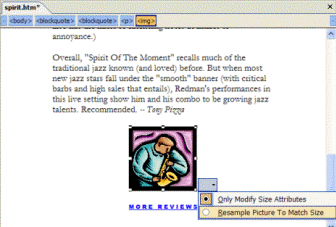
Change the Size of a GraphicThis is part of Chapter 3 of the book Sams Teach Yourself Microsoft FrontPage 2003 in 24 Hours by Rogers Cadenhead, published November 2003 by Sams Publishing The size of any graphic on a Web page can be changed -- increased to a larger size, shrunk to a smaller one, or even distorted so that the width is at a different scale than the height. The size of a graphic can be changed in two ways in FrontPage. You can resize the actual graphic, which alters the file containing the image, or change the display size of the graphic. Graphics presented on a Web page can be displayed at sizes larger or smaller than their actual size, making it possible for the same graphic to be presented at different sizes on two different pages of a Web site. Because of this, it's important to note the difference between resizing a graphic -- changing its actual dimensions -- and simply displaying the graphic at a different size, which does not alter the original graphic file. If you're never planning to display a graphic at the larger size, resizing the graphic is a better choice because it loads faster when a visitor views your page. (If the graphic isn't from the clip art library, save a copy of the larger graphic somewhere for safekeeping.) Clip art graphics look better when they are permanently resized instead of displayed at a different size because FrontPage works some image-editing mojo on the file to smooth edges and sharpen details. This process is called resampling the graphic.
Figure 3.9 To resize a graphic, follow these steps:
To change the size, drag the box to a new location to make the picture larger or smaller.
After clip art has been added to a page, it can be treated like any other graphic. You can move it around, add a caption, and make other changes. Chapter 3: |
| HOME / FEEDBACK / ORDER THE BOOK / OTHER BOOKS / THANKS |
|
|
|
| HOME / ORDER THE BOOK / OTHER BOOKS / THANKS |